
Even though hardwood flooring is extremely pleasant to look at, it is very vulnerable to moisture, rot, and water-damage. Fortunately, there is a solution for this problem. And no, we aren’t talking about laminate! The most talked-about flooring material on the market is luxury vinyl planks. This flooring has the durability and resistance of vinyl while having the same visual appeal as wood, making it one of the top products in the flooring industry. Additionally, because it is completely man-made, you get to choose your preferred style.
Vinyl planks are also ideal for DIY enthusiasts since the installation process is very easy and entertaining. To learn more about it, read these 5 quick & easy steps for installing luxury vinyl planks in your home:
SOME BASICS ABOUT DIY INSTALLATION
Whether in the kitchen or the basement, luxury vinyl planks are a great addition for a home. Apart from being resistant, they are also much cheaper than hardwood (even though they achieve the same look). But, their key benefit is a quick & easy installation.
When installing luxury vinyl, one doesn’t even have to use a nail gun. This is because vinyl planks are literally a jigsaw puzzle. Instead of nailing each plank, you just need to click the different pieces together. This is revolutionary method in flooring installation because it doesn’t involve intensive labor and expensive tools. In fact, the only tools you will need for installing luxury vinyl planks are:
-
A utility knife (You can also use a table saw)
-
A rubber mallet
-
Pliers
-
Knee-pads for protection
MAKE SURE THE SUBFLOOR IS NEAT
When installing hardwood, you need to add an underlayment. However, luxury vinyl has an underlayment layer incorporated in its design. This makes the installation process much cheaper right at the start. The only thing you need to do before you start laying the planks is to prepare the subfloor.
This means cleaning it from debris, removing leftover carpet staples, fixing holes, and strengthening subfloor joists. The staples can be removed with pliers and to strengthen the joints you just need to nail the areas which are squeaky.
Additionally, you should make sure that the subfloor is dry. If you notice rot and damp spots, contact professionals to find the root of the problem. You might be facing leaky piping or a damaged roof.
CHOOSE YOUR FIRST WALL
Every flooring installation should start from the sides. Before you click the planks together though, you need to decide a few things. First, in which direction should the planks be placed and second, what sizes should I start with.
So each wooden flooring has a direction, the planks are either directed from front to back or from left to right. Directing the planks toward the door will make the space feel deeper, while directing them from left to right will create the illusion of more width. The latter is easier to plan, but this decision depends on the look you want to achieve.
After you choose the direction, start with your first side (the room’s wall) and measure how much planks will fulfill the entire perimeter. This is the part when you will adjust the plank’s sizes either with a table saw or a utility knife. Be careful when you cut the planks and make sure that everything is straight.
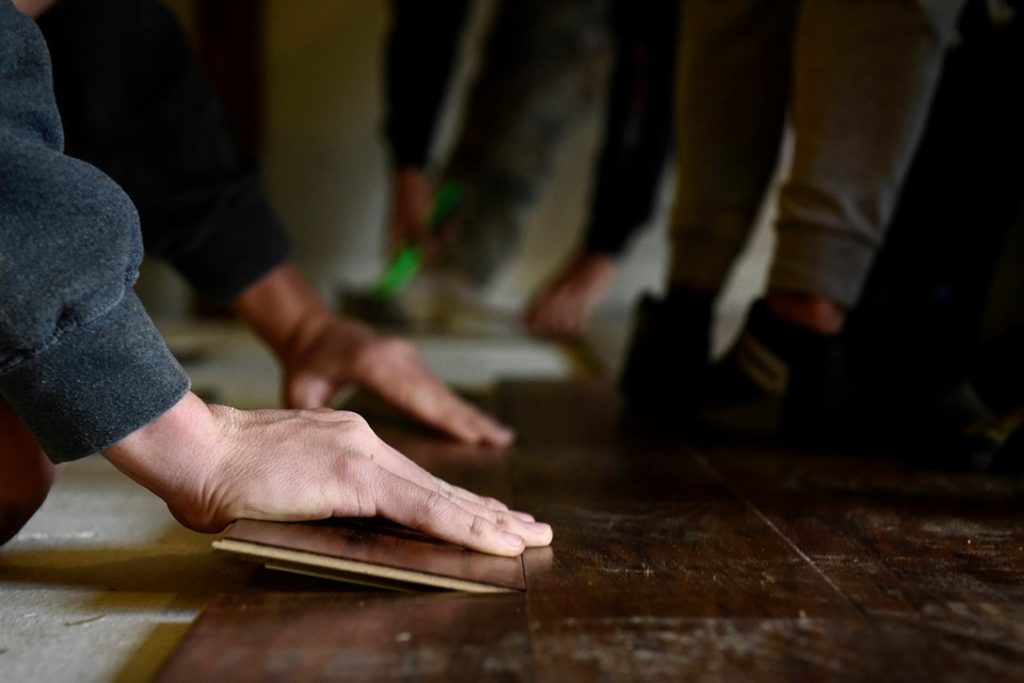
SOLVE THE JIGSAW PUZZLE
When you make sure that everything fits, start clicking the luxury vinyl planks together. This process is basically like solving a jigsaw puzzle. The only part where a bit of physical effort is involved is when you use the rubber mallet to secure the joints.
As we mentioned before, you will need to cut and adjust the planks so that they fit the entire room. Experts suggest leaving a few inches (an extension gap) from the wall and the first plank. This can easily be done with spacers. You can use blue tape to keep the spacers intact during the installation process.
-
Extra tip: Mind the patterns of each plank. You want to match planks according to their patterns so that they you achieve maximum visual appeal. Also, don’t forget to use the smaller parts that you have cut from larger planks.
DON’T BE AFRAID TO CUT CORNERS
When installing a new floor, homeowners will immediately bump into a few problems. One of the most common ones are corners and door jambs. When you get to the corner, simply take measurements with a measure tape and use a pencil to draw the corner’s outline on the plank. Afterwards, cut the plank so it fits in the corner.
When you get to a door jamb, you have two options. The first option is to cut the plank while the second one is to cut the jamb. Both are equally recommended, but most prefer the first option. To adjust the jamb, simply put the plank next to it and mark its height with a pencil. Then use a saw to cut out the door jamb so that the plank fits inside.
THE ICING ON THE CAKE
As we saw, installing vinyl plank flooring is very simple. You just need to click the planks together, cut some door jambs, and that’s it! The final steps are like icing on the cake, just a few touches. This includes adding trims and baseboards to bridge the extension gap. Additionally, you can paint over the nails you used for the baseboard.
After you finish with everything, it’s time to clean the room from dirt and debris. Depending on your skill and experience, installing this type of flooring can last from 1 to 3 days. In any case, there is much less work involved than with the installation of other materials such as tile and hardwood. DIY vinyl plank installation is ideal for those who want to experiment and get the job done with minimum effort.